What is the SkyServer? 
NGSS Connections
Supports DCI PS4.A Wave Properties, PS4.C: Information Technologies and Instrumentation
Information can be digitized, stored, communicated and analized. Solutions based on criteria and constraints can be found of societal needs and wants.
SkyServer is a collection of web-based tools that serves up the sky.
You read that correctly. To the computers at Johns Hopkins University, the sky around the star Regulus in the constellation Leo might look something like this:
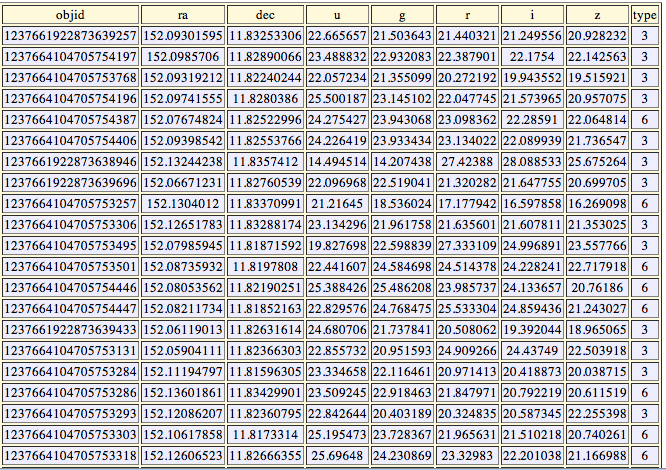
All of those numbers are great for computers, but they don’t mean much to most people. These numbers, and millions more, are stored on large computers and organized into many tables of measurements that can be searched and organized in different ways. This is called a database. The Sloan Digital Sky Survey (SDSS) database contains dozens of different measurements for over 900 million objects.
 The SkyServer allows us to see the information in the database as pictures of different parts of the sky that the SDSS telescope and camera have imaged. All of the information that goes along with each object is still available, but it is “served up” in a people-friendly form.
SkyServer has a number of different tools that help us see what is in the SDSS database. Navigate is one of those tools. We start by exploring the sky around the bright star Regulus in the constellation, Leo. Next, we will investigate the same area using Navigate.
The Constellation Leo
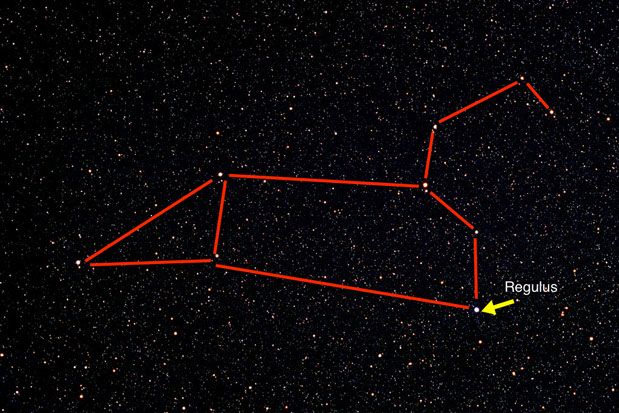
We start in the constellation Leo, the lion. A constellation is a group of stars that have been given a name. There are a few bright stars that form the outline of the constellation, but any star or group of stars that are within or near that shape are said to be in that constellation. To modern astronomers, each constellation is a well-defined region of space around the main stars.
From a very dark site, Leo might appear as it does in the image to the right. Can you spot the bright stars that make up Leo? What about the bright star, Regulus? Click the image to see.
SkyServer Navigate Tool
We are going to use the SkyServer Navigate tool to find what the star Regulus looks like as seen by the Sloan Digital Sky Survey. Click the link below to open the Navigate tool in a new window.
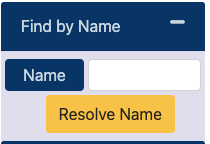
Use the Find by Name feature of Navigate to find Regulus. Enter “Regulus” in the textbox and click Resolve Name.
The Navigate tool will reload with Regulus in the middle of the window. What do you see?
Difference — I can’t see the constellation!
The first thing you may have noticed when you looked at Regulus in the Navigate tool is that you can’t see the entire constellation. You are seeing only Regulus and the area immediately around it.
You can see a wider area by clicking on the +/- zoom buttons in the top left of the Navigate window. Click + to zoom out. As you do this, the detail you are able to see goes down but the area of the sky contained in the window increases.
The area you are able to view within the window or through a telescope is referred to as a field of view. Even when you have zoomed your field of view out as far as you can go, you still can’t see any of the other bright stars in the constellation Leo.
You have just discovered that the field of view changes as you change the magnification. Describe this change in your notebook. The telescope itself has a lot to do with the field of view, but for now it is enough to note the way in which the image changes as you zoom in and out.
Next, let’s investigate the area of the sky around Regulus. Click and drag to move the view in Navigate tool, and use the +/- zoom buttons to zoom in or out. Record your observations.
Obviously, the sky looks a lot different in SkyServer compared with standing out under the stars. Let’s look at the differences we notice and try to understand them as an astronomer would.
Difference — The stars are a lot brighter!
The first thing you notice is that Regulus is blindingly bright in Navigate. Blinding is a good description from the SDSS camera’s point of view. Almost all of the effects you see on the image of Regulus are the results of too much light.
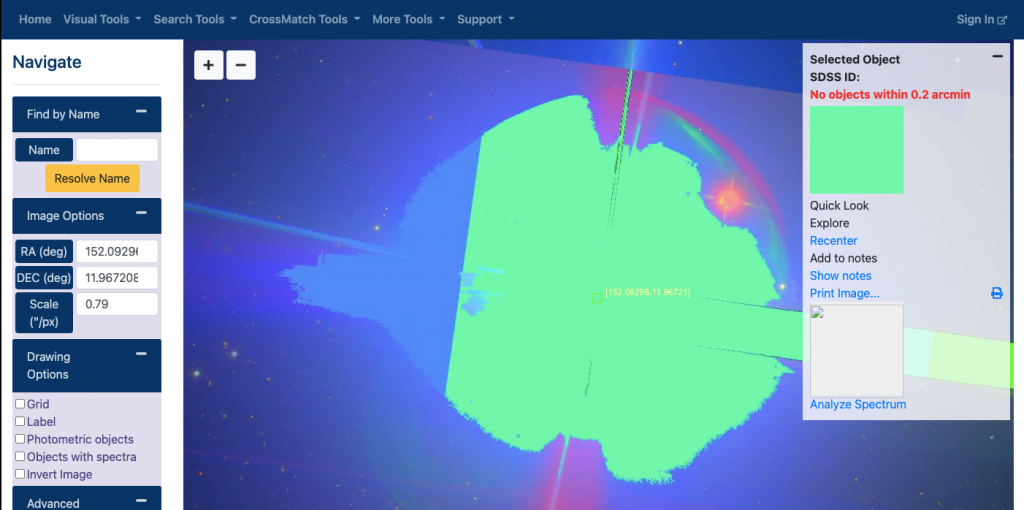
The first thing you notice is that Regulus is blindingly bright in Navigate. Blinding is a good description from the SDSS camera’s point of view. Almost all of the effects you see on the image of Regulus are the results of too much light.
On the right side of the Navigate tool, you will see a box labeled Selected Object. This box lists all the basic astronomical information about the object you have chosen. In the case of Regulus, Navigate reports that there are no objects found within 0.2 arcmins! (Arcmins, or arcminutes, are a measurement of separation of objects on the dome of the sky.) How is it possible that there is no information?
The SDSS telescope and camera were engineered to record images of very faint, distant objects. The result is that it is not a good telescope for studying bright objects like Regulus. Because the light spills over to create the spikes you see and bounces around the inside of the telescope to produce all of those colored bands, the information cannot be used in the same way as it is for faint target objects. As a result, no information is reported for bright objects. The measurements that are taken of Regulus are for the purpose of removing its light from the surrounding objects.
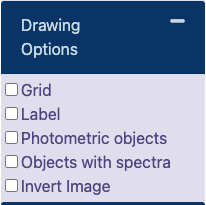
How can we know which objects have data? Use the Drawing Options menu on the left side of the Navigate tool. Select the Photometric Objects checkbox under Drawing Options to take a closer look.
Small blue circles will appear around objects that have SDSS images and data. You might need to zoom out a bit to see some objects.
Difference — Regulus looks a lot bigger
When you go outside and look up at a dark sky filled with stars, you see them as pinpoints of light. Some of the points are brighter than others, but they are all points of light. Only the moon or planets are large enough to appear as discs in the sky. In astronomy we say that your eyes are able to resolve the object. No telescope on Earth is able to resolve or “see” a star as a disc. Why not? Why does Regulus appear to be a large circle in Navigate?
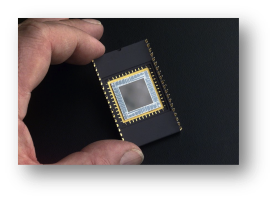
First, Earth’s atmosphere scatters some of the light. When viewed with only our eyes, stars may appear to twinkle. When twinkling light falls on the recording surface of the SDSS camera, it does not land neatly in a single spot. The recording surface of the camera is called a charged coupled device, or CCD. The CCD is a grid of tiny “light buckets” called pixels. The energy from the light striking the surface liberates electrons that are counted. A record of the charge liberated from each pixel is recorded as a grid of numbers. The charge (electron) is coupled with the light in a predictable way that allows us to create images. Creating images is just one thing that can be done with this information.
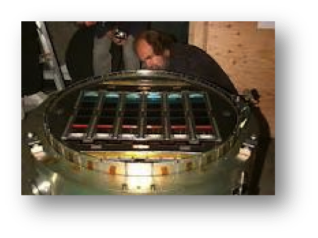
Compare the single CCD from a home camera (left) to the 30 CCDs from the SDSS camera.
Another reason for our observation of huge stars in SDSS has to do with exposure time – or the ability to record light over different periods of time. In the case of CCDs, exposure time is the amount of time the pixels (light buckets) are allowed to fill before they are counted. The goal of the Sloan Digital Sky Survey is to record very distant, faint objects. One of the tools used to do this is long exposure times. The SDSS CCDs collect light for 54 seconds. There is a trade off, however; while long exposure times allow you to detect very faint objects, pixels recording bright objects fill and overflow. In the end, these objects appear much bigger than they do with the unaided eye.
Another factor adding to the amount of light gathered from objects captured by the SDSS CCDs is the size of the telescope mirror. If we think of the CCD pixels as light buckets, the telescope is a light funnel. The primary mirror of the SDSS telescope is 2.5 meters across. That is a very big collecting surface. Light striking the mirror is focused (funneled) onto the CCD and recorded for 54 seconds.
Difference – Many more objects are visible!

Remember all that light being funneled by the 2.5 meter mirror onto 30 CCDS? Each of those 30 CCDs is a grid of 2048 x 2048 pixels. That is 4,194,304 pixels for each CCD! The CCDs are arranged in 6 columns of 5 CCDs each. Each row of CCDs is covered by a different filter that allows only certain colors or wavelengths of light to pass through. The combination of information from these different filters is what allows SkyServer to produce colored images in Navigate. Let’s look at what those 4 million pixels allow us to do.
Large numbers of pixels allow us to zoom in on objects in an image and still see a lot of detail. Image quality remains high as you zoom in. Here is how it works:
We started with a digital image of the constellation Leo. If we zoom in on Regulus, we quickly reach a point where we see the individual pixels. You can just make out other objects near Regulus, but you see no detail at all. Now, let’s see what SkyServer has to offer.
Right: zooming in to see the individual pixels
Scanning Around
Return to scanning the sky around Regulus until you find an object other than a star that you would like to observe. It is likely to be a distant galaxy like the one pictured here. Notice that when you center on that object some basic information about it is displayed in the Selected Object section to the right. The box reports information about the location of the object (RA and Dec), the type of object (galaxy, star, or quasar) and the brightness of the object as measured through each of the five filters.

You now have used a few of the tools that are available to you for exploring the images and data that are contained in the Sloan Digital Sky Survey. All of the images and information you see in these tools are stored on computers. This storage system is called a database. When you access one of the SkyServer tools to look at images or view measurements, the tool retrieves the needed information from the SDSS database. You can use these tools to explore on your own, create collections in the NoteBook or continue your voyage by exploring more activities on this website. You can even learn something about the computer language astronomers use to retrieve their own information from the database.