SkyServer Navigate
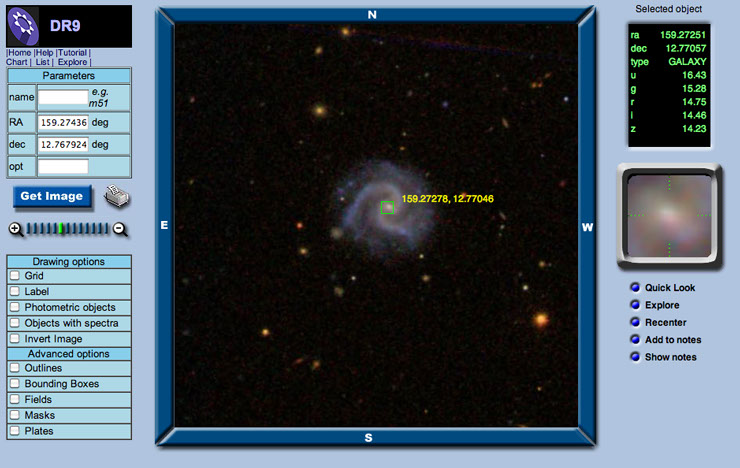
Navigate is a tool that allows you to see what is in the SDSS database. Navigate handles a variety of visual tasks. It: scans any part of the sky the SDSS has imaged; moves to a different part of the Sloan-imaged sky with just a few clicks; zooms in and zooms out; overlays different SDSS elements; and views basic photometric information about the objects you click on. A summary of basic information about each object is available through the Quick Look link. When you are ready to learn more, the power of the Explore page for each object is just one click away.
Parameters
The Parameters pane displays the location of the object that is in the center of the image window using a unique pair of numbers (coordinates) called right ascension (RA) and declination (dec). If the object you want to observe has a commonly used name, you can type it in the name box, and SDSS will provide the correct RA and dec when you tab to the next box. You can change RA and dec yourself if you know the coordinates of the new location. Finally, you can also use the direction buttons along the edge of the image window to move small distances from your central object. You have to click the recenter button on the far right side of the Navigate page to display the new RA and dec.
Opt stands for options. You don't need to do anything with this box. When you choose different Drawing or Advanced Options check boxes, this box will record your choices.
Get Image
Any time you change the parameters (ra and dec) you must click the Get Image button to let Navigate know you are ready to have it "point" to a different part of the sky.
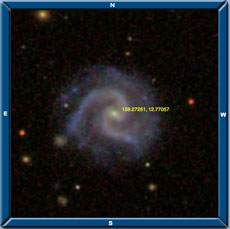
Zoom
This is the same galaxy shown on this page. The only difference is that we have zoomed out but a factor of two. When you use the zoom tool, either by clicking of the magnifying lenses (step out by a factor of 2) or by selecting any bar on the tool (jumps to the zoom factor indicated) the image window automatically readjusts. Notice that the coordinates (ra and dec) of the selected object continue to be displayed
Drawing Options
Drawing Options is the first section of the option checkboxes. These are the most often used features. As you check each box, the image in main window changes automatically. Use the links below to see what each box does and how the feature might be used to help you research objects in SDSS
• Grid
• Label
Advanced Options
Advanced Options is the second section of the options checkboxes. These features are usually associated with more complex information. As you check each box, the image in main window changes automatically. Use the links below to see what each command does and how the new information might be used to help you research objects in SDSS.
• Outlines
• Fields
• Masks
• Plates
Thumbnail Zoom
This window displays a small zoomed image of the area within the green selection box in the Navigate window. It is helpful when trying to center precisely on an object.
Selected Object
The Selected object box in Navigate displays the basic visual (photometric) information about the object that has been selected in the image window. It is important to note that this is the basic data available from analysis if the light from the different SDSS filters, NOT the spectrograph. If the object has a spectrum associated with it, you need to click the Explore button to view that information.
Quick Look is just that, the most commonly referenced pieces of information about an object on one page, with access to all the rest just a few clicks away. Follow the links below for an explanation of the features in Quick Look Main Window and Sidebar

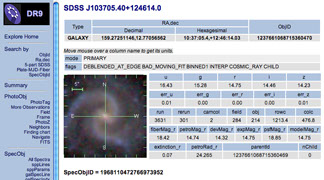
Explore
When Quick Look and Navigate are not enough to satisfy your curiosity about an object, Explore is the tool to use. Just about anything the SDSS has recorded about an object is accessible through Explore. The best, most reliable information, is prominently displayed in the main window. The sidebar contains links to additional information.
Recenter
Using the N, S, E, W buttons, you can sift the image in the Navigate window by a set number of pixels. As long as you do not click inside the window, you can always return to your starting point by using recenter.
If you find a new object to investigate, select the object and then click recenter before you zoom in. The zoom function operates on the center of the Navigate window.
Add to Notes
SkyServer can keep track of objects you find intersting through with the Add to notes function. This function is accessible through Navigate, Explore and Quick Look and remains available no matter where you start until you close out all browser windows that link to Notes.
Show Notes
Objects you select may be saved to your notes. You can access your notes from Navigate, Explore or Quick Look using the Show Notes command. This notebook remains available until you close all all SkyServer windows and tabs you have been working in.
Direction Buttons
If you want to scan around the general area that you are centered on in the image window, you can use the direction buttons, N, S, E, W. Each time you click a direction button, the image shifts a set number of pixels in that direction.
Imagine that what you see in the Navigate window is your view through the SDSS telescope. When you click N, for example, you are telling the "telescope" to point more to the north. Whatever is in the center of the image appears to move toward the S. It will become second nature once you try it out a few times.
Direction Buttons
If you want to scan around the general area that you are centered on in the image window, you can use the direction buttons, N, S, E, W. Each time you click a direction button, the image shifts a set number of pixels in that direction.
Imagine that what you see in the Navigate window is your view through the SDSS telescope. When you click N, for example, you are telling the "telescope" to point more north. Whatever is in the center of the image appears to move toward the S. It will become second nature once you try it out a few times.
Direction Buttons
If you want to scan around the general area that you are centered on in the image window, you can use the direction buttons, N, S, E, W. Each time you click a direction button, the image shifts a set number of pixels in that direction.
Imagine that what you see in the Navigate window is your view through the SDSS telescope. When you click E, for example, you are telling the "telescope" to point more to the east. Whatever is in the center of the image appears to move toward the W. It will become second nature once you try it out a few times.
Direction Buttons
If you want to scan around the general area that you are centered on in the image window, you can use the direction buttons, N, S, E, W. Each time you click a direction button, the image shifts a set number of pixels in that direction.
Imagine that what you see in the Navigate window is your view through the SDSS telescope. When you click W, for example, you are telling the "telescope" to point more to the west. Whatever is in the center of the image appears to move toward the E. It will become second nature once you try it out a few times.